Sending push notifications is one of the best ways to re-engage users with your app. However, adding push notifications to your iOS app can be a challenge because of the sheer amount of iOS versions and all the changes in Swift and Xcode. A lot of notification classes we got used to in the past are not present in the newer iOS versions, which adds to the confusion.
There are quite a few guides that show you how to implement push notifications for iOS apps but most are either outdated or too complicated to make heads or tails of. Another problem is that a lot of guides don’t cover the features of Xcode 9 and Swift 3 and don’t offer backward compatibility for older iOS versions that support Swift. Worse still, they don’t include any information on the user of the new APNs (Apple Push Notifications Service) Auth Keys. And that’s a shame because these keys do a great job simplifying the steps that need to be taken to send push notifications.
We’ve written a guide that will help you implement push notifications in your iPhone and iPad app. You’ll be able to send them from Node.js by using the latest technology quickly and easily.
Getting Started
First of all, you should open your iOS app project in Xcode 8. If this is your first iOS project, then download Xcode 9 and create a new project. Make sure that you are using Swift 3.
Secondly, you’ll need an active Apple Developer Program Membership account. Membership costs $99/year and you have to be a member to add push notifications to your iOS app. When your membership becomes active, you will need to set up Xcode to use the iCloud account that has your active Apple Developer Program Membership.
After that, you’ll need to configure the app’s Bundle Identifier in the project editor and you’ll be good to go.
Adding Push Notifications to Your App
First of all, you need to enable the push notifications feature in Xcode 9. To do that, go to the project editor for your app, navigate to APNS, and go to the Capabilities tab. Then click on Push Notifications and change the value to ON.

xCode will then show two checkmarks telling you that the capability to send push notifications has been enabled. These checkmarks are there to let you know that Xcode created an App ID in the Developer Center and enabled the Push Notifications service for your app.
Assign Device Tokens
To receive push notifications from your app, you should identify your devices. When a device installs your app, APNs assigns a unique device token to it. You can use the token to send push notifications whenever you want. When the device receives a unique token, it should persist in your backend database.
A device token looks like this:
5311839E985FA01B56E7AD74334C0137F7D6AF71A22745D0FB50DED665E0E882
Open AppDelegate.swift and add the code below to the didFinishLaunchingWithOptions callback function before the return statement to request a device token for the device you’re using:
// iOS 10 support if #available(iOS 10, *) {UNUserNotificationCenter.current().requestAuthorization(options:[.badge, .alert, .sound]){ (granted, error) in } application.registerForRemoteNotifications()} // iOS 9 support else if #available(iOS 9, *) {UIApplication.shared.registerUserNotificationSettings(UIUserNotificationSettings(types: [.badge, .sound, .alert], categories: nil)) UIApplication.shared.registerForRemoteNotifications() } // iOS 8 supportelse if #available(iOS 8, *) {UIApplication.shared.registerUserNotificationSettings(UIUserNotificationSettings(types: [.badge, .sound, .alert], categories: nil))UIApplication.shared.registerForRemoteNotifications()}
The process is different in iOS 10 because Apple introduced a new framework called UserNotifications. You’ll have to import it to get access to the UNUserNotificationCenter class.
To do that, add this import statement to the top of AppDelegate.swift:
import UserNotifications
When that’s done, go to the project editor for your target and navigate to the General tab. Find the Linked Frameworks and Libraries section, click on the + sign and choose UserNotifications.framework:

Then add these callbacks in AppDelegate.swift. They will be invoked when APNs has either successfully registered the device by assigning a unique token to it or failed to register it:
// Called when APNs has assigned the device a unique tokenfunc application(_ application: UIApplication, didRegisterForRemoteNotificationsWithDeviceToken deviceToken: Data) {// Convert token to stringlet deviceTokenString = deviceToken.reduce("", {$0 + String(format: "%02X", $1)})// Print it to consoleprint("APNs device token: \(deviceTokenString)")// Persist it in your backend in case it's new }// Called when APNs failed to register the device for push notificationsfunc application(_ application: UIApplication, didFailToRegisterForRemoteNotificationsWithError error: Error) {// Print the error to console (you should alert the user that registration failed)print("APNs registration failed: \(error)") }
You will need to implement the logic that will keep the token persistent in your app’s backend. Further on in this guide, we’ll demonstrate how your backend server will connect to the APNs and send push notifications. To do that, it will provide the device’s token and indicate which device or devices should get push notifications.
Keep in mind that the device token may get changed in the future for a number of reasons. We suggest that you use NSUserDefaults, a local key-value store, to keep the token locally. That way you’ll only need to update your backend when the token changes, which will help you to avoid needless requests.
Another thing you should remember is to run your app on a physical iOS device when working on implementing push notifications, especially after modifying AppDelegate.swift. iOS simulators can’t receive push notifications, so using them in this scenario is pointless.
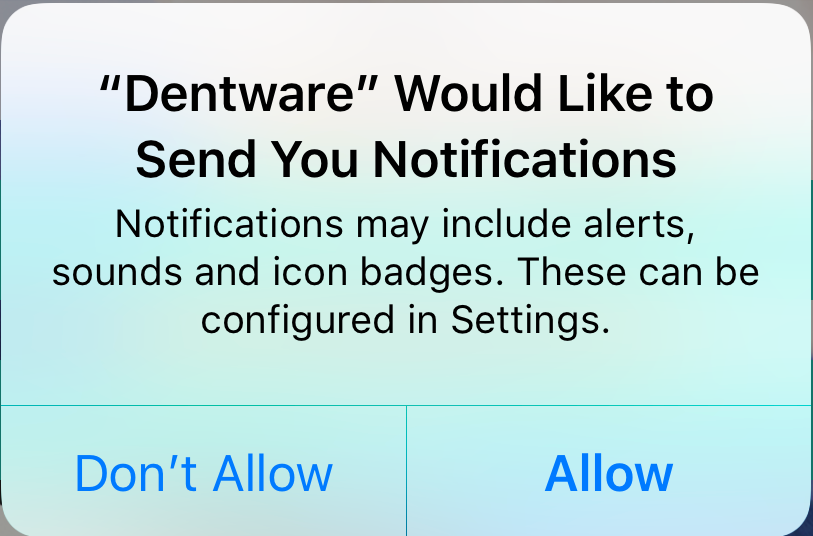
When you see the following popup, tap OK to allow your app to receive push notifications:
After that, Xcode console will show your device’s unique token. You should copy and save it for later use.
Do Preparatory Work to Receive Notifications
Now we need to get everything ready to receive push notifications. First, add this callback in AppDelegate.swift. It will be invoked every time your app receives a push notification from your backend server:
// Push notification receivedfunc application(_ application: UIApplication, didReceiveRemoteNotification data: [AnyHashable : Any]) {// Print notification payload dataprint("Push notification received: \(data)")}
This callback will only get invoked if the user taps or swipes to interact with your notification or if the user had your app open when the push notification came through.
The exact logic of your push notifications depends on the type of your app, so you should figure it out by yourself. For example, a messenger might push new messages as notifications and tapping on them should open the conversation page. When working on this, use data object that contains the data you send from the backend (chat ID if yours is a messenger app).
There is a slight hiccup, though. If your app is open when the device receives a push notification, the user won’t see it. So you should think of another way of notifying the user of a new event in case the app is already in use. Check out this StackOverflow question for workarounds. For example, you could display a banner that looks similar to native iOS notifications.
Generate an APNs Auth Key
The next thing for you to do is generate an authentication key. That key will make it possible for your backend server to authenticate its requests with APNs when it wants to send push notifications to your devices.
This process used to be cumbersome. You had to fill out a Certificate Signing Request in Keychain Access, upload it to the Developer Center, download a signed certificate, and then export its private key from Keychain Access. You also had to convert both certificates to the .pem format. The certificate had to be renewed every year. Worse still, it was only valid for one scheme, Development or Production.
Luckily, Apple has made things much simpler by introducing APNs Auth Keys. These keys never expire unless you revoke them and work with all deployment schemes.
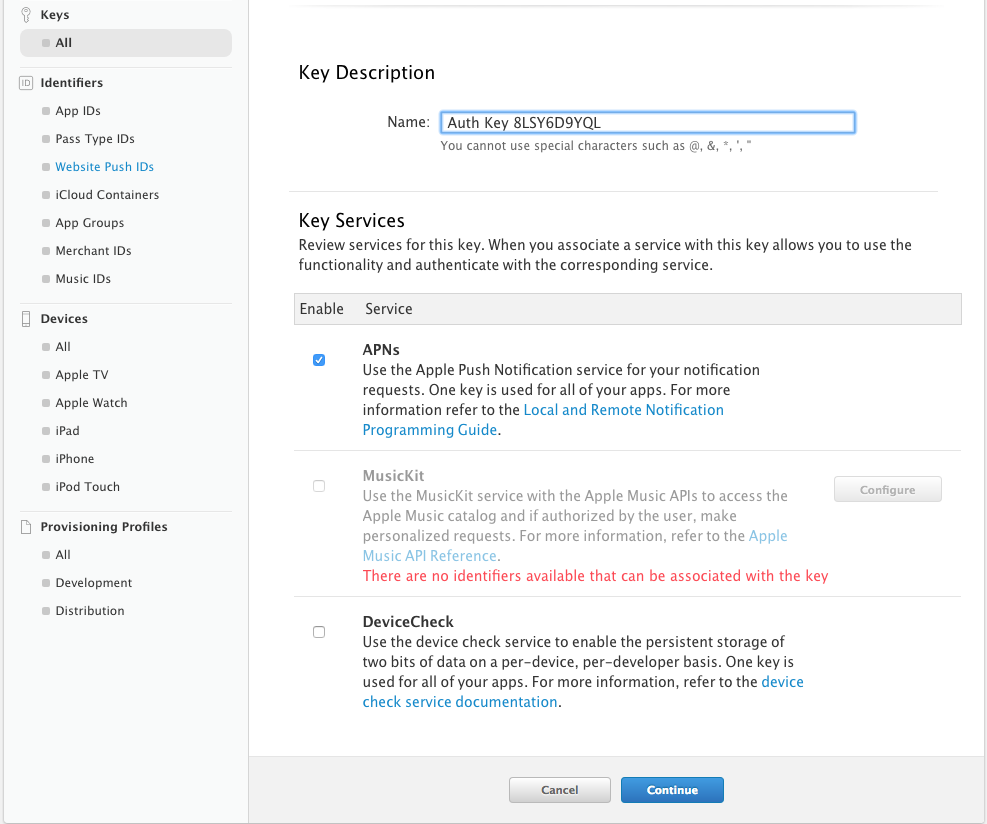
To generate an APNs Auth Key, go to the Developer Center and navigate to Keys – All. When there, click on the “+” button to generate a new Auth Key.

Go to the next page and type in a name for your key. Then enable APNs and click on Continue at the bottom of the page. Make sure the APNs checkbox is selected.
When done, click on Confirm on the next page. Apple will generate a .p8 key file for you. The file will contain your APNs Auth Key. 
Then download the .p8 file and save it for later use. Don’t forget to write down the Key ID – you’ll need it when you will be connecting to APNs.
Send Push Notifications
Now you’re very close to your goal. So, let’s configure your backend to connect to APNs and send push notifications. We’ll show you how to do it in Node.js.
First of all, check that you have Node.js v4 or newer installed on your local computer and run the following code in a directory of your choice:
mkdir apnscd apnsnpm init --yesnpm install apn --save
This will launch a new Node.js project and install the apn package from npm. The package will authenticate with APNs and send your push notifications.
Now you’ll need to copy the .p8 key file you downloaded into the APNs folder that you’ve just created. You can name the file apns.p8 to keep things simple.
Then, create a new file in the APNs folder and name it app.js. Use your favourite editor for this task. Now paste the code below into the file:
var apn = require('apn');// Set up apn with the APNs Auth Keyvar apnProvider = new apn.Provider({token: {key: 'apns.p8', // Path to the key p8 filekeyId: 'ABCDE12345', // The Key ID of the p8 file (available at https://developer.apple.com/account/ios/certificate/key)teamId: 'ABCDE12345', // The Team ID of your Apple Developer Account (available at https://developer.apple.com/account/#/membership/)},production: false // Set to true if sending a notification to a production iOS app});// Enter the device token from the Xcode consolevar deviceToken = '5311839E985FA01B56E7AD74444C0157F7F71A2745D0FB50DED665E0E882';// Prepare a new notificationvar notification = new apn.Notification();// Specify your iOS app's Bundle ID (accessible within the project editor)notification.topic = 'my.bundle.id';// Set expiration to 1 hour from now (in case device is offline)notification.expiry = Math.floor(Date.now() / 1000) + 3600;// Set app badge indicatornotification.badge = 3;// Play ping.aiff sound when the notification is receivednotification.sound = 'ping.aiff';// Display the following message (the actual notification text, supports emoji)notification.alert = 'Hello World \u270C';// Send any extra payload data with the notification which will be accessible to your app in didReceiveRemoteNotificationnotification.payload = {id: 123};// Actually send the notificationapnProvider.send(notification, deviceToken).then(function(result) {// Check the result for any failed devicesconsole.log(result);});
Before you run this code, make sure you’ve done the following:
- Configured the keyId property with the APNs Auth Key ID (available at https://developer.apple.com/account/ios/certificate/key)
- Configured the teamId property with your Apple Developer Account Team ID (available at https://developer.apple.com/account/#/membership/)
- Configured deviceToken with the device token you generated after running your application and checking the console
- Configured notification.topic with your application’s Bundle ID, which is accessible in the project editor
Now it’s time to test everything out. Lock your device and run node app.js. If you followed these steps correctly and did everything right, you should receive a push notification to your iOS device.
If you interact with the notification, the following will appear in your Xcode console because didReceiveRemoteNotification got invoked:
[AnyHashable("id"): 123, AnyHashable("aps"): {alert = "Hello World \U270c";badge = 3;sound = "ping.aiff";}]
We hope that you found this tutorial easy to follow and you can now send push notifications to any iOS device.
If you have any questions please don’t hesitate to ask our experts 🙂
